Witajcie :)
Niebawem luty, a w tym miesiącu mamy Walentynki.
Z tej okazji kupujemy różne upominki dla osób, które są dla nas ważne. Proponuję wykonanie takiego upominku, a będzie nim magnes na lodówkę.
Hello :)
Soon it will be February, and this month we have Valentine's Day.
On this occasion, we buy various gifts for people who are important to us. I suggest making such a gift, and it will be a refrigerator magnet.
Do wykonania magnesu potrzebujemy:
- tekturę,
- papier scrapowy oraz biały,
- papierowa serwetka (gotowa lub wycięta z wykrojnika),
- serduszko (drewniane lub z tekturki)
- koronki i inne elementy do ozdobienia,
- magnes (może być taki z taśmy lub kawałek maty magnetycznej),
- klej, nożyczki,
To create the magnet, we will need:
- Cardboard,
- Scrapbooking paper and white paper,
- Paper napkin (pre-made or cut out from a die-cut),
- Heart shape (wooden or cardboard),
- Lace and other decorative elements,
- Magnet (it can be from a strip or a piece of magnetic sheet),
- Glue, scissors.
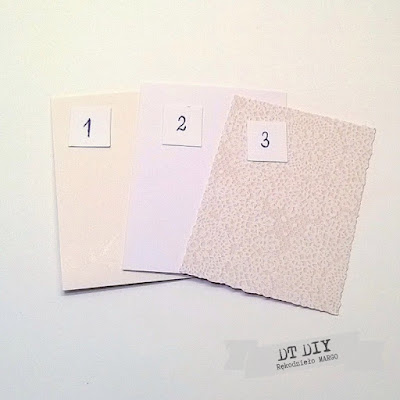
1. Wycinamy z tektury (1) i białego papieru (2) prostokąt o wymiarach 6x8 cm. Z papieru scrapowego (3) wycinamy prostokąt o 2 mm mniejszy. Sklejamy ze sobą wszystkie 3 warstwy.
1. Cut a rectangle from the cardboard (1) and white paper (2) with dimensions of 6x8 cm. From the scrapbooking paper (3), cut a rectangle 2 mm smaller. Glue all three layers together.
2. Następnie przyklejamy koronkę, a na nią papierową serwetkę. Koronkę można też nakleić wcześniej na papier scrapowy zawijając jej brzegi pod spód (zanim go przykleimy do pozostałych warstw).
2. Next, glue the lace, and on top of it, the paper napkin. You can also attach the lace earlier to the scrapbooking paper by wrapping its edges underneath (before gluing it to the other layers).
3. Do serduszka przyklejamy koronkę lekko ją marszcząc. Najlepiej przykleić klejem na gorąco.
3. Attach the lace to the heart shape, slightly ruffling it. It's best to use hot glue for this step.
4. Z papieru scrapowego wycinamy pasek papieru o szerokości ok. 1,8 cm i długości 7,3 cm. Bigujemy go na obydwu końcach w odległości 0,5 cm od brzegu (środkowa część paska musi być szersza od bazy o ok. 3mm po to, aby później ten pasek po przyklejeniu do bazy był lekko wygięty). Docinamy drugi pasek papieru scrapowego ( u mnie to ten w kratkę) tak, aby pasował do pierwszego. Sklejamy je ze sobą tak żeby obydwa były widoczne.
4. From the scrapbooking paper, cut a strip about 1.8 cm wide and 7.3 cm long. Fold it at both ends, 0.5 cm from the edge (the central part of the strip should be wider than the base by about 3mm, so that when glued to the base later, the strip will be slightly curved). Trim another strip of scrapbooking paper (for example, the one with a pattern) to match the first one. Glue them together so that both are visible.
5. Przyklejamy do bazy przygotowany pasek smarując klejem tylko te 0,5 cm końcówki.
5. Attach the prepared strip to the base by applying glue only to the 0.5 cm ends.
6. Cut out a heart shape from the scrapbooking paper and glue it onto the wooden base. Add the inscription.
7. Na koniec przyklejamy na odwrocie magnes.
7. Finally, attach the magnet on the back.
A to już gotowa praca.
Można ją jeszcze dodatkowo ozdobić wg uznania.
Można ją jeszcze dodatkowo ozdobić wg uznania.
And there you have it, the finished piece.
You can further decorate it according to your preferences.
You can further decorate it according to your preferences.
Myślę, że zrobienie takiego magnesu nie sprawi Wam trudności.
Wręcz przeciwnie, będzie to czysta przyjemność :)
Wręcz przeciwnie, będzie to czysta przyjemność :)
W pracy wykorzystałam papiery Lemoncraft z kolekcji Sweetness
Życzę więc powodzenia w twórczym działaniu.
Bawcie się dobrze!
I believe creating such a magnet won't pose any difficulties for you. On the contrary, it should be pure pleasure :)
I used Lemoncraft papers from the Sweetness collection for this project.
So, I wish you success in your creative endeavors.
Have fun!
Pozdrawiam 😀
Małgorzata z Rękodzieło Margo


Fajny :)
ReplyDeleteDziękuję bardzo :)
Delete