Witajcie! // Hello everyone!
Wiosna tuż, tuż... Spring is just around the corner...
Z pewnością myślicie już o wiośnie, rozwijającej się przyrodzie i cieple przygrzewającego słońca. Budząca się do życia przyroda, a szczególnie pierwsze kwiaty mile wszystkich nastrajają. Dzisiaj mam dla Was tutorial na kwiaty wykonane ze sznurka w wiosennych kolorach.
Zapraszam!
I'm sure you're already thinking about spring, the blossoming nature, and the warm sunshine. The awakening of nature, especially the first flowers, brings joy to everyone's mood. Today, I have a tutorial for you on making flowers from twine in spring colors.
Let's get started!
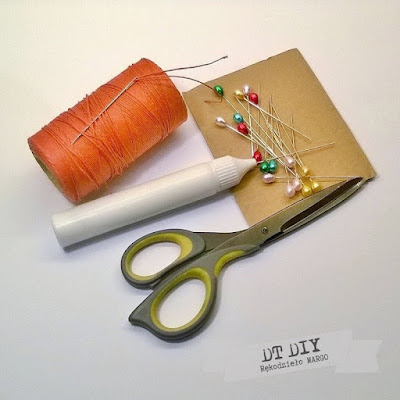
Do wykonania kwiatów potrzebujemy:
- kawałek tektury z pudełka,
- sznurek,
- szpilki lub wykałaczki,
- igłę, nożyczki, ołówek, linijkę.
To make the flowers, you'll need:
- A piece of cardboard from a box,
- Twine,
- Pins or toothpicks,
- Needle, scissors, pencil, ruler.
1. Z tektury wycinamy kółko o średnicy 5 cm (takiej wielkości będą kwiaty). Oczywiście możecie wyciąć kółko o innym rozmiarze w zależności od tego jakie chcecie uzyskać kwiaty. Następnie rysujemy na nim linie dzielące je na 12 równych części. Te linie wskazują gdzie mamy wbijać szpilki lub wykałaczki.
1. Cut out a 5 cm diameter circle from the cardboard (this size will make the flowers). Of course, you can cut out a circle of a different size depending on the flowers you want. Then, draw lines on it dividing it into 12 equal parts. These lines indicate where to insert the pins or toothpicks.
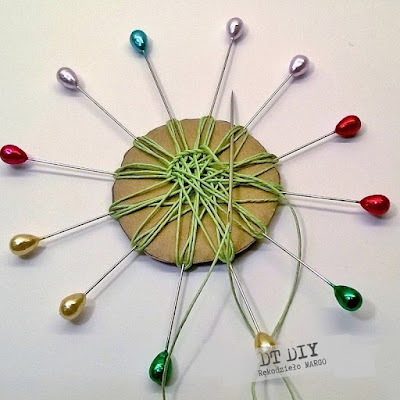
2. Teraz przeplatamy sznurek nawijając go na szpilki w kierunku przeciwnym do ruchu wskazówek zegara. (nie ucinałam sznurka na konkretną długość tylko przeplatam prosto ze szpulki). Sznurek przeplatamy góra - dół do momentu aż będzie nałożony dookoła.
2. Now, weave the twine by wrapping it around the pins in a counterclockwise direction (I didn't cut the twine to a specific length, I weave it straight from the spool). Weave the twine up and down until it's wrapped around completely.

Czynność powtarzamy drugi raz czyli na każdej szpilce mają być po 2 nawinięcia.
Repeat this step a second time, meaning there should be 2 wraps on each pin.
3. Następnie ucinamy sznurek zostawiając ok. 40 cm i nawlekamy go na igłę. Teraz przeplatamy go 2 razy pod każdym płatkiem kwiatu czyli 4 sznurkami (mamy 12 szpilek to jest 12 płatków) aż obejdziemy dookoła ( w kierunku przeciwnym do ruchu wskazówek zegara). Sznurek przyciągamy dość mocno.
3. Next, cut the twine leaving about 40 cm and thread it onto the needle. Now, weave it twice under each petal of the flower, meaning with 4 strands (since we have 12 pins, that's 12 petals) until we go all the way around (in a counterclockwise direction). Pull the twine fairly tight.
Wyciągamy szpilki, ściągamy kwiat z tektury. Przeszywamy kilka razy przez środek kwiatu i zakańczamy po lewej stronie. Końcówkę sznurka możemy podkleić klejem. Kwiatek jest gotowy. Środek kwiatu po stronie lewej i prawej nieco się różni więc musicie sami zdecydować, która strona bardziej się Wam podoba.
Remove the pins, take the flower off the cardboard. Stitch through the center of the flower several times and finish on the left side. You can glue the end of the twine. The flower is ready. The center of the flower on the left and right sides is slightly different, so you have to decide which side you prefer.
Drugi sposób wykonania kwiatka jest analogiczny do momentu nałożenia sznurka na szpilki. Teraz nawlekamy sznurek na igłę i przeplatamy go 1 raz pod 2 sznurkami i znów 1 raz pod 2 kolejnymi sznurkami tego samego płatka (mamy 12 płatków to razem będziemy przeplatać 24 razy) aż obejdziemy dookoła ( w kierunku zgodnym do ruchu wskazówek zegara). Sznurek przyciągamy dość mocno.
The second way of making the flower is similar to the step of wrapping the twine around the pins. Now, thread the twine onto the needle and weave it once under 2 strands and then once under the next 2 strands of the same petal (since we have 12 petals, we will weave a total of 24 times) until we go all the way around (clockwise). Pull the twine fairly tight.
Tym sposobem uzyskamy nieco inny efekt. Osobiście właśnie ten podoba mi się bardziej.
This way, you'll get a slightly different effect. Personally, I prefer this one.
A to już gotowe kwiaty w różnych kolorach.
And there you have it, finished flowers in various colors.
Takie kwiaty możecie wykorzystać do kartek, koszyczków, wianków czy innych wiosennych dekoracji.
Robi się je bardzo szybko, a przy okazji miło spędza wolny czas.
Życzę miłej zabawy przy tworzeniu kwiatów 😀
Pozdrawiam wszystkich!
You can use these flowers for cards, baskets, wreaths, or other spring decorations.
They're made very quickly and are a fun way to spend your free time.
Enjoy making the flowers! 😊
Best regards to everyone!
Małgorzata z Rękodzieło Margo


Fajne te kwiatki takie wiosenne i kolorowe a kursik super . !!!
ReplyDeletePozdrawiam
Dziękuję, bardzo mi miło. Kwiaty zrobione z myślą o wiosennych projektach i świątecznej dekoracji.
DeleteEkstra hehe 😀😃🙂
ReplyDeleteTo super :) Dziękuję.
Delete